|
|
|
by Bnuts40
Note: In this example we will create a flash animation to demonstrate an automatic animation or "Tween".
1. Open Flash 4 and create a new Flash Movie Project. See Flash Overview.
2. Select Frame 1 with the mouse and insert a Keyframe (F6). (Frame 1 is a keyframe by default).
3. Using the Circle tool, draw a small circle in Frame 1. Position the
circle to the left side of the frame with the Pick Tool. -
![]()
4. Hit "F5" four times to insert four more frames. (See Figure 1).
5. Select Frame 5 with the mouse and insert a Keyframe (F6). (The circle drawn in Frame 1 will appear in Frame 5).
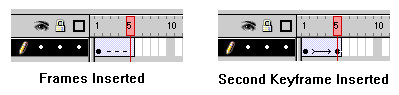
Figure 1
6. Select Frame 5 and drag the circle to the right of the screen with the Pick Tool.
This completes a simple Tween.
7. Select "Control > Test Movie" from the Menu Bar to view your animation.
Add additional frames as follows:
8. Now - select a frame between frames 1 and 5.
9. Press and hold "F5" to insert 15 or 20 additional frames.
10. Select "Control > Test Movie" from the Menu Bar to view
your animation.
(Note how smoothly the animation runs with the additional frames).
Add additional Tweening attributes as follows:
11. Select a Keyframe in the movie and select "Modify > Instance". The Instance Properties dialog box will appear.
12. Select the "Color Effect" tab in the Instance Properties dialog box.
Note: This will give the option of adding Brightness, Tint, Alpha and Special Effects into the Tween. See Creating Advanced Tweens.
Remember: Only objects in Keyframes (including pics, buttons and symbols) can have their "Instances" edited in this way. The First Keyframe will be the beginning of the Tween and the Last Keyframe will be the end of the Tween.